Explore Web3 with CHAIN CHAMPS
Our cutting edge solutions get you the data you need to secure, grow and understand your Web3 projects.
Our cutting edge solutions get you the data you need to secure, grow and understand your Web3 projects.
Million
Million
+
Whether it's stability, onboarding new users, clearing out an infestation of bots - we have your back. Data is key to building and developing your business, in the Web3 age, there's more publicly available data than ever before.
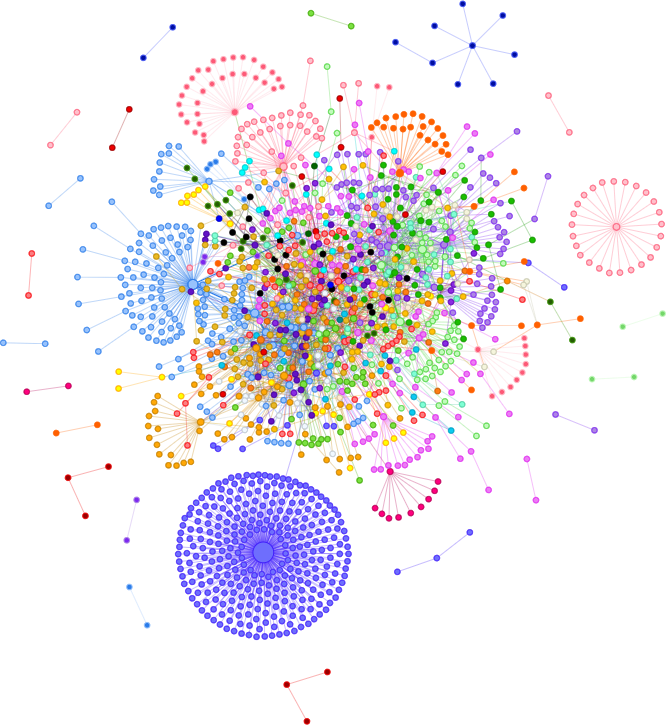
Our network graphs help you identify different groups of users. Whether they're bots, multi-accounts or friend groups that are all using your dApp.

We analyze both primary and secondary market sales to build a picture of where users are coming from.
Reports can be built for any contract. Analyze popular launches before you make your own.

The TRUST API helps you identify what wallets are doing. We flag wallets as bots, profiteers, market manipulators, and a whole lot more. If you're protecting your dApp, or investigating a wallet, TRUST can help.
Unlock your team's true potential with our state-of-the-art SaaS platform. From intelligent task management to real-time collaboration and top-notch data security, we have everything you need to streamline your workflows and achieve high productivity.
Protect yourself, protect your community. We help identify and mitigate both common and emerging attack vectors.
At some point, every Web3 project has to deal with bots. We'll help you identify the problem and give you the data you need to stop bots in their tracks.
Get to know your customers. Who is collecting your NFTs, who is playing your game... Who is there to make a quick buck?
Running an airdrop? Don't reward the people trying to abuse your system. Identify Sybil Attacks and more with TRUST.
TRUST analyzes more than wallets. It also analyzes the health of tokens and NFT collections. Leverage our data to identify scams and rug pulls.
Network graphs tell complicated stories with beautiful visuals. Quickly identify problems with tokens, collections or networks.
The most important part of building a Web3 community, is protecting your Web3 community. TRUST helps you do that and more.
Tell us how you want to grow, and we'll find the data you need to make your dreams a reality.